Friday, October 7, 2011

Jennifer - Warner Robins Senior Photographer

Another fun senior! I found a new location that I absolutely love! Thank you for letting me be a part of this wonderful time in your life!!!


Just Married! Tiffani & Donovan - Warner Robins Wedding Photographer

What a blast with this wonderful couple at their wedding! Thank you Tiffani & Donovan for sharing this wonderful occasion with me! I had the honor of shooting their engagement and their wedding. :)


Friday, September 23, 2011

What is your style?

I remember asking about style when I first got into photography. I didn't really know what my style was, or how I was supposed to find it. I knew that there were certain photographers that inspired me. I remember someone telling me that I had to FIND my own style through shooting (trial and error you could call it). I already knew what editing styles I liked, I just needed to figure out how to achieve my own technique and determine if I was more of a "posed" or "photojournalist" shooter. First off I didn't want to just flat copy someone else... I loved their work, and knew that particular "look" is what I wanted to achieve... but I needed to make it my own.

Someone recommended that I should put together a posing guide for myself. I went online to the photographers I was most inspired by and pulled some of their photos into my posing guide. I studied this guide, even took it with me on shoots to refer to if I needed. I knew NOTHING about properly posing a person when I first got started, so I needed my security blanket. Heck, I still use that thing at times, because I still don't feel comfortable trying to pose people without some help. What I do try to avoid is taking one of those photos and totally recreate it... I don't use the same location, background, props, composition ,etc. I don't try to make my photo look 100% like someone else's. Sure, there are some poses that have become sort of a "tradition" - like standing on the railroad tracks. But when I pull a pose from a photo I like, I try to reinvent it - tweak it.

There is nothing wrong with using your inspiration for learning purposes -- over time you will learn the technique and figure out exactly what YOUR niche is. Not everyone automatically knows everything there is to know about photography - technical side, composition, posing... and we may never know everything... I'm learning knew things every day... and we all start somewhere.

Monday, September 12, 2011

S&S Photo Backdrops & Floors 500 Fan Give Away!!!

We here at S&S Photo Backdrops & Floors are so excited to see our fan base growing! We are having a 500 fan give away to celebrate and say THANK YOU to our fans! I remember when he hit 100, I was ecstatic. To watch our business grow like this is a wonderful feeling! My "baby" is growing up.

So the rules are as follows:

1. You must "like" each of the participating vendors on Facebook and post here that you did so. THIS IS YOUR ENTRY.

2. You can get another entry by posting the giveaway in your status. Leave a second comment (with a link to your page) that you did so. This will be your second entry.

3. You can get additional entries for each purchase you make from the vendors during the giveaway, just make sure you leave a separate comment for each item purchased.

I will draw a different winner for each item, so there are more chances to win! If your name is drawn twice you will with both prizes. The more entries, the better your odds.


The give away will run from 9/13/2011 - 9/24/2011. The contest will end at 11:59 PM EST on the 24th. 


VENDORS:

S & S Photo Backdrops and Floors - 54" x 5' Matte Polypropylene Backdrop or Floordrop with a design of the winner's choice (solid colors excluded) - $50 value. Winner required to pay shipping.


Skeeterbug Props - Stork Pouch - $25 value.


Creative Process Photography - Handspun Newborn Elf Hat with Extra Long Tail & Tassel - $38 value.

WEBSITE
FACEBOOK

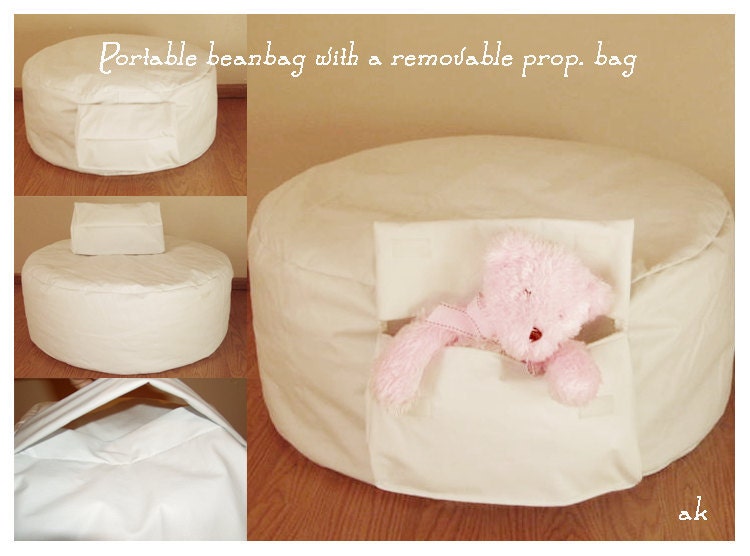
Posing Beanbags Photography Pros - Portable Beanbag with Prop Bag (Color: Sky Blue) - $44 value.

 ETSY
FACEBOOK

There are 4 vendors, so you have 4 chances to win!

Tuesday, August 30, 2011

Shooting in Low Light Conditions


One of the biggest challenges photographers face is not having enough light. Especially when shooting weddings, concerts, anything indoors...

"You just spent $500 on a fancy digital camera, so why do your pictures of your kid blowing out the candles on her birthday cake look so terrible? The answer is that indoor, low-light photography is not always as simple as point and shoot." 

There are several things one can do when shooting in low light... First, you can always bring in more light. External flash, strobe lighting, reflectors, etc are all ways one could increase the light in an indoor space.

But while using a flash seems to be the obvious answer to low light situations, they have their downsides. Not only does a flash interfere with the "moment"... it also tends to flatten images, distort colors and wash out skin tones. It also tends to provide "uneven" light on and around your subject. This problem is especially true with the cheap, built-in flashes on most compact digital cameras. When using a flash, the best kind to use is an external flash, commonly known as a speedlight. The pro's will tell you to just nix using your pop up flash all together. A speedlight with the capability to rotate or tilt the flash in order to bounce it off the ceiling is a good way to balance the light. Another good use of an external flash is to mount it off camera.

If no "external light source" what do you do? The first thing pros will suggest is to ratchet up your camera's ISO or "light sensitivity" setting. Traditionally, high speed film (ISO 800 and higher) was better suited for low light photography. Unfortunately, where high speed film produced enlarged grain, which could often be used for artist effect, higher ISOs on digital cameras tend to just produce color noise -- little specks of red green and blue scattered across your image.

Most point and shoot cameras, even those with manual controls, won't produce quality images above 400 ISO. The solution then is to use lower ISO settings, but that means you'll be facing a new concern -- long exposures.

Noise Reduction Software
High ISO setting tend to create unacceptable levels of color noise in the finished image. There are some ways to get rid of color noise after the fact. Photoshop ships with a noise filter which will smooth your pixels by blending surrounding areas together.

Unfortunately, for all but the most basic situations, the results won't bowl you over. Dedicated software like Noise Ninja ($35-$80, depending on the license) can produce much more dramatic improvements with very little blurring or other side effects. It isn't cheap, but if you do a lot of low light photography, it's a godsend.

Overexpose to Reduce Noise

Another way to reduce noise in a photo is to slightly overexpose your image to the right of the histogram (works especially well if shooting in RAW) and adjust the exposure down in post processing.This works okay for low light situations, and the main thing is to only overexpose to the point before you blow out your whites. If you blow out the highlights in the image, you won't be able to get the detail back. Most cameras have a "blowout warning" that will flash on the screen if you are too far overexposed. 

The image below is your histogram. The left image is a normal exposure (the middle of your meter.) The right image is a slight overexposure, but not to the point of blowout.


If you expose to the point of blowing out your highlights your histogram will look like this:


 Reducing Motion Blur

Long exposure times increase the chance you'll blur the shot, whether through the subject's movement or yours. Here are a few tips for blur-free shots:
  • Start with the largest aperture your camera allows. Use aperture-priority mode if you have one and set f-stop down to f/1.8 or the lowest available.
     
  • Set the ISO higher (and overexpose to reduce noise as described above).
  • If you have a zoom lens, zoom out as much as possible. More light will hit the photo sensor and exposure time will go down.
  • If the exposure time is still greater than what you can handhold, use a tripod, or anything that will keep your camera still.
  • Consider something small like the Gorilla Pod, a small, flexible tripod which will fit nicely in the average coat pocket. There are several sizes available, some of which probably won't fit in your pocket but still aren't as cumbersome as full-size tripod.
  • If you don't like to carry even a tiny tripod with you all the time, don't worry - there are plenty of solid objects that can fill the role. Just hold your camera up to anything that doesn't shake - a lamppost, a tabletop, a wall - and press on it to keep it still while you take the photo.
  • To reduce the shake that results from pressing the shutter button, use the camera's timer function. Most cameras will have a two-second delay timer that works great, especially on long exposures.
If you have a surgeon's hands, you can try hand-holding even long exposures. Pick a solid stance with your legs slightly apart (like two legs of a tripod). Brace the camera against your face and hold your breath while you press the shutter. Be sure to zoom in on the resulting image to check for blurring! 

Balance Your Whites

The next challenge you face in low light situations is the lighting. In most cases you'll be shooting in artificial light -- the chandelier above your dinner table for instance. 

Light temperatures from incandescent bulbs or florescent overheads can cast yellow or blue tones over a scene. Sometimes, this can have a nice warming effect (in the case of incandescent light). But other times it may not be what you're looking for. 

The solution is to adjust the white balance in your camera. Most digital cameras offer a variety of preset white balance settings which you can experiment with. If all else fails you may be able to customize your own settings. Keep in mind that if you're shooting RAW images, you can always change the white balance after the fact using software. 

Timing Is Everything

Here's our general guide to exposure times (assuming the widest aperture possible). You'll need to experiment to see what works for you.
  • Christmas lights: 1/4 to 3 seconds of exposure.
  • Cityscapes: 2 to 30 seconds.
  • For a night sky with star trails, use the formula: exposure = 600s/focal length of the lens in millimeters.
 http://howto.wired.com/wiki/Shoot_Better_Low-Light_Pictures


Friday, August 26, 2011

Photography is my Heart & Soul

John 15:1-2 "I am the true vine, and My Father is the vine-dresser... every branch that bears fruit He prunes, that it may bear more fruit.”

Art, photography, music... is my heart. I've grown up with a passion for these things and a large artistic ability. I want to use this ability for good and to do God's will. This is part of why I came up with my business name (and the fact my middle name is Grace...)

I don't want to be your run of the mill, charge an arm and a leg photographer. ;-) Don't get me wrong, I need to be able to bring in enough income to support my business and family, and one day retire when I'm old and feeble, but I don't want to get rich off of this. I'm also hoping that the other side of my business (selling backdrops) will eventually be enough to carry my photography business so that I am able to provide my services for less. I want to reach out to people who may not be able to afford professional photography, and provide awesome quality images for them.

I want to get involved in charities like OPLove, and reach out to the local DFCS office to provide pro bono services to high school seniors in foster care. I want to provide lower-cost wedding photography to reach people who don't have bookoos of funds to splurge on their big day, but still need to document that special time.

God gave me my gifts and talents, and I want to use them for others, not just myself. The area I live in is not a rich one. It is extremely under-served, and I want to join our church's ministry to reach our community... to change lives and the city we live in.

Tuesday, August 23, 2011

Pose Me Baby Giveaway!

For details: http://lovelifefamilyphotography.com/Blog/2011/08/10/time-for-yet-another-great-giveaway/#comment-149


It’s a Good One too!!! Yay!!!
You know you wannna win!!!
I am trying to get my shop off the ground..(so to speak ;)  )
Pose Me Bay on Etsy opened it’s shop on July 17th 2011!!!
I see LOTS and LOTS of people checking it out.. Making it their Favorites.. But no one is diving in..
So here is my plan ;o)
The winner will get a Code to check out with that will make it $o and 0 cents..
In return… Please Review Pose Me Baby on Etsy :)